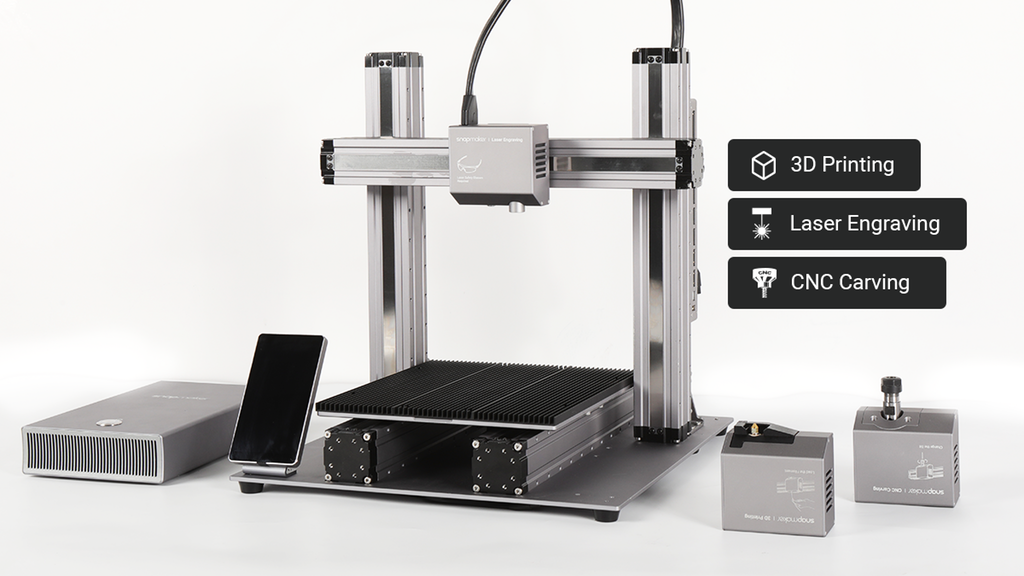
Unlock your full creative potential from 3D printing to laser engraving, cutting and CNC carving. Smarter, larger, and more powerful.
Latest Updates from Our Project:
You Have Invested in a Flexible, High-Performance Modular Fabrication Tool System
almost 7 years ago
– Fri, May 31, 2019 at 01:23:57 AM
Unlike any other all-in-one 3D printers that feature limited and less-capable interchangeable tool heads, when you swap modules on a Snapmaker 2.0 3D printer, you are essentially building a new machine such as an extra-large CNC router, a more powerful laser cutter, and even a 4-axis CNC router / laser engraver. Backing this project is also an investment in your hobby, personal projects, and your future. You won’t be limited or break the bank to buy other essential tools when you expand your interest from 3D printing to other digital fabrication technologies.
What You Can Make in the Near Future
Snapmaker 2.0 can grow with you and adapt to various technologies. You can enjoy a lot of new features simply by getting new modules or new kits. For example, if you want to CNC carve 3D sculptures or laser engrave on columnar items, the common 3-axis machines cannot meet your needs as they generally process on flat materials. However, these applications can be realized easily by adding a rotary 4th axis to your Snapmaker 2.0 A250 or A350.
Snapmaker 2.0 A150, A250, and A350 are not only feature-rich, high-quality and easy-to-use 3D printers, but also the most expandable maker tools on the market. In the future, we’ll release a wide variety of new modules and add-ons periodically, which will constantly improve both the functionality and user experience of our products. We want to make this fabrication tool system the best choice for you creating a well-rounded, easy-to-install and affordable mini workshop in your home.
Priority Explained:
P1 (3 stars) Will be available for preorder during Reward Survey. & Will be delivered together with your Kickstarter rewards.
P2(2 stars) Will be available for preorder when we start shipping out Kickstarter rewards. & Will be delivered after most Kickstarter rewards. We will try to speed up the development of these add-ons and will probably make some of them available during Reward Survey.
P3 We have not listed these add-ons (IP Camera, Emergency Stop Button, Handwheel, and more) in the table above. The development plan for these add-ons is relatively flexible and lower than the add-ons with the priority of P1 or P2.
How We Made It the Most Modular and Expandable 3D Printer
Modularity is the core of Snapmaker 2.0 modular 3-in-1 3D printers. You choose which add-ons to further upgrade or customize your printer. Adopting the CAN bus expansion solution, the newly designed Snapmaker 2.0 controller module allows you to do more with Snapmaker, and do it your way. You will be able to enjoy any of the powerful features listed in the table above with the future expansion options, without buying other completely new machines.
Our engineer David has explained how we made space for bigger thinking and balance the adaptability and affordability when developing Snapmaker 2.0 system:
“We wanted to push modularity to the next level, giving creators flexibility for now, but also for later, as new technology becomes available. Adopting CAN (Controlled Area Network) bus expansion was one of the most significant ways we were able to do that. It’s a technology, often used for automating vehicles and industrial robots, that allows microcontrollers to ping information to each other in applications without complicated wiring connecting each one. New features can be added with software alone. It’s known for being a robust, efficient, and flexible technology. As far as we know, no other 3D printer is using it.”
“Using the CAN bus protocol, the controller is able to connect all modules and add-ons in the Snapmaker 2.0 system. Each module / add-on contains a chip for receiving and responding to all transmitted messages. Rather than a bigger control board with tangled cables, we've upgraded to universal ports, multiport adapters, and a CAN hub for adding additional CAN bus ports. This allows for easy modification and will let us add more ports and controls in the future. It even lets us include our backers in developing new features, which has caught the attention of many professional KOL (Key Opinion Leader) users who amplify the project to their followers.”
You can learn more about how we built a loyal following and took the time to create a better product in this essay on Product Hunt.
After our Kickstarter campaign, we will release a line of accessories that lets you upgrade your printers modularly to fit your various creative projects. Stay tuned for Snapmaker 2.0 future products, which will continue with more exciting add-ons!
Livestream
We will host a LIVESTREAM in our Facebook group next week! We will show you the 4-axis laser engraver in action, answer your questions and reveal more product features in the livestream. Click here to join our group now! We will share the livestream time and more information in the group soon.
Help us spread the word #newSnapmaker with your friends!
Thank you for backing this project! As always, please keep sharing your feedback and suggestions below!
Sincerely,
Team Snapmaker
The Manufacture Process, Maker Faire, and Showcase Videos
almost 7 years ago
– Fri, May 24, 2019 at 12:46:56 AM
Dear backers,
Snapmaker 2.0 is more than just a 3D printer. A confluence of technologies and manufacture processes of Snapmaker 2.0 promises to raise the standard of maker tools. This isn’t our first success. Our original model also hit the market and received a huge support back in 2017. It featured quality all-metal construction that consistently print, engrave, cut and carve objects in high resolution. In making Snapmaker 2.0, we pushed the boundaries of all-metal construction even further.
How We Made It High Quality
What makes Snapmaker products fascinating and unique is that every part of the machine is made with remarkable precision, using advanced techniques and machining equipment.
This video shows the main steps in producing Snapmaker modules of our original model. Soon after this campaign, we’ll start the pilot production of Snapmaker 2.0 A150, A250 and A350. We feel confident about the product quality and that we will hit the delivery dates we are providing.
Snapmaker 2.0 modular 3-in-1 3D printers are built to deliver consistent and high-quality performance. Although they are more complex than our original model. To manufacture such advanced products, we’ve carefully evaluated the existing partnered suppliers and we also contacted many new top-tier suppliers to ensure that all parts will be made in high quality.
Almost all components are made from high-strength metal and then CNC machined into precision parts. We will use anodizing to make the surface of all modules into a durable anodic oxide finish. Overall, due to the higher level of automation, both the quality and the speed of production have been significantly improved. Each process is strictly controlled, and every part is meticulously made. In many ways, they are even more beautiful internally than externally.
The sturdiness of the linear modules is the key to the precision of the printer. In Snapmaker 2.0, we change the original POM rollers to steel rollers to further enhance the sturdiness and durability of the printer. This mechanism ensures a high repeatability of 0.005 mm. Also, we’ve designed a steel sealing strip to make the linear modules enclosed. It can eliminate the problem of dirt accumulation and protect all internal components effectively, making them even more durable.
Maker Faire Bay Area
Our team had a fantastic time at the Bay Area Maker Faire last weekend! We met a lot of good friends, backers of Snapmaker original model and Snapmaker 2.0! If you missed it last weekend, and if you are interested in learning what other backers think of Snapmaker modular 3D printers, you can catch it all in this video:
Thank you so much to everyone who came to visit us at our booth and gave us great feedback of our products and community! Truly inspiring!
Thanks again for joining us in this project! Your support is amazing. Looking forward to getting the Snapmaker 2.0 products out into the world!
As always, please keep sharing your feedback and suggestions below!
Sincerely,
Team Snapmaker
Autodesk and Kickstarter Test Print
almost 7 years ago
– Thu, May 16, 2019 at 02:06:38 AM
Dear backers,
We’ve tested common tests like the 3D Benchy and shared the print result in our campaign page. However, the 3D Benchy doesn’t test everything. We’d like to try another 3D test model. In your comments, you said you would love to see the Autodesk / Kickstarter test model printed on Snapmaker 2.0. Here’s the update.
The test geometry is a single, consolidated STL file that tests a printer’s dimensional accuracy, resolution, and alignment. We tested it on the Snapmaker A150 prototype and printed with a layer height of 0.2 mm.
To assess dimensional accuracy, measure each tier of the dimensional accuracy stack and record the absolute different between the target and the measured dimensions in a table.
Record a “1” if the magnitude of the overall average error is greater than 0.40mm.
Record a “2” if the magnitude of the overall average error is between 0.31 and 0.40mm.
Record a “3” if the magnitude of the overall average error is between 0.21 and 0.30mm.
Record a “4” if the magnitude of the overall average error is 0.11 and 0.20mm.
Record a “5” if the magnitude of the overall average error is between 0.0 and 0.10mm.
Snapmaker A150 earned a score of 5 for this test.
2.Fine Flow Control
Using a pair of calipers, measure the height of the shortest spire on the top of the test print. Visually inspect for threads of material connecting the spires. Measure the shortest spire.
If the spires are less than 30mm long, assign a 0.
If the spires are greater than 30mm, but there is stringing between them, assign a 2.5.
If the spires are greater than 30mm long and there is no stringing between them, assign a 5.
Snapmaker A150 earned a score of 4 for this test.
3.Fine Negative Features
Attempt to remove all the pins from their holes using fingers (no tools).
Record a “0” if no pins can be removed.
Record a “1” if 1 pin can be removed.
Record a “2” if 2 pins can be removed.
Record a “3” if 3 pins can be removed.
Record a “4” if 4 pins can be removed.
Record a “5” if all pins can be removed.
Four pins were removable from the test print. But the pin with the smallest tolerance failed. For this test, the Snapmaker A150 earned a score of 4.
4.Overhangs
Inspect the overhang surfaces.
Record a “1” if the printer compiled the geometry but dropped loops and infill on the 15, 20, and 30 degree overhangs.
Record a “3” if only the 15 and 20 degree surfaces differ from the 45 degree overhang.
Record a “4” if only the 15 degree overhang differs from the 45 degree overhang.
Record a “5” if there the surface finish between all four overhang surfaces is equivalent.
Snapmaker A150 earned a score of 3 or 4 for this test.
5.Bridging
Inspect for contact between bridges and the surface beneath each.
Record a “1” if more than 3 are in contact with the surfaces beneath them.
Record a “2” if 3 bridges contact the surfaces beneath them.
Record a “3” if 2 bridges contact the surfaces beneath them.
Record a “4” if 1 bridge contacts the surface beneath it.
Record a “5” if no bridges contact the surfaces beneath them.
For this test, there are 3 bridges contact the surfaces beneath them. So Snapmaker A150 earned a score of 2.
6. XY Resonance
Visually inspect the X and Y ringing features, illuminating the test print from the side to highlight any ringing captured in the print.
If rippling in the X or Y axis can be observed at or past three hash marks, record a “0”, otherwise, record a “2.5”.
Snapmaker A150 earned a score of 2.5 for this test.
7.Z-axis alignment
If a layer registration effect with a period equal to that of the leadscrew is visible on the pillar supporting the fine positive features test, record “0,” otherwise, record “2.5.”
You can check out the test result in the video above, from 01:00 to 01:07. There’s no periodic ripple in Z-axis. The layers are stacked properly with the same layer height. So Snapmaker A150 earned a score of 2.5 for this test.
Scoring
Sum the results of each section of the test protocol. The highest possible score is 30, indicating a very well-calibrated system.
Here’s a breakdown of Snapmaker A150’s results:
Dimensional Accuracy: 5 of 5 points
Fine Flow Control: 4 of 5 points
Fine Negative Features: 4 of 5 points
Overhangs: 3 of 5 points
Bridging: 2 of 5 points
XY Resonance: 2.5 of 2.5 points
Z-Axis Alignment: 2.5 of 2.5 points
Overall, the A150 prototype scored a total of 23 out of 30 points.
That's all for our first test on Autodesk / Kickstarter Test Print. Hope you enjoy it. If you are interested in seeing further tests using this model, we can make another update to share more about the improved design of the 3D printing module and more tests :)
What’s Next?
You may see any of the following test results for the next update: 3D printing with ABS and PETG, Laser cutting, and CNC cutting. Can’t wait to share more videos with you!
As I’m writing this now, there are almost 1,000 comments in this campaign. I’m very happy to see that it has connected so many active backers in just one week. I’m going to select top ten topics and share our thoughts on these topics in upcoming updates.
You can make a difference. Help us spread the word #newSnapmaker with your friends!
Thank you for backing this project! As always, please keep sharing your feedback and suggestions below!
Sincerely,
Team Snapmaker
You Backed Us – The Most Funded 3D Printing Project! Timelapse Videos Sharing
almost 7 years ago
– Tue, May 14, 2019 at 12:28:53 AM
Dear backers,
We recently reached two special milestones, and they happened so fast with the tremendous support from you, the 3D printing community on Kickstarter. Thank you!
Record-Breaker
15 hours after launching, the project’s funding total hit $3 million dollars!
33 hours 15 minutes after launching, the Snapmaker 2.0 project became the Most Funded 3D Printing project on Kickstarter! The previous record-holder was The Micro: The First Truly Consumer 3D Printer, which raised $3,401,361 in 30 days in 2014.
As I’m writing this now, we’ve raised over $4.1 million dollars and gathered a community of almost 4,000 early adopters.
You can make a difference! You backed us, and you made this project the most funded project in the 3D Printing category! You have proven that the 3D printing community on Kickstarter is still thriving! We are also happy that Snapmaker 2.0 has introduced more people to the wonderful 3D printing world.
Printing, Engraving, Cutting, and Carving Timelapse Videos
You shall never back a 3D printing crowdfunding project without seeing a video of the printer in action. This week, we’re going to share with you various timelapse videos that we recently made with Snapmaker 2.0.
Some of you have asked that whether A350 can print with ABS. So we quickly made two tests to share with you. We will make more videos showing its ABS printing performance and share them with you during this campaign.
The 14th annual Maker Faire Bay Area 2019 blasts off this upcoming Friday, May 17! It will be our first time to attend this event. Can't wait to meet you and to introduce you to Snapmaker 2.0 at our booth: Zone 2, No. 2219. Join us at the greatest show on earth!
We noticed that many of you had actively discussed about the import taxes for the US shipping and the VAT for the EU shipping. By the end of this week, we will be able to share with you the latest updates on these questions. Thank you for your patience!
Thanks again for supporting this project! You’re backing our vision, not simply backing a 3D printer.
As always, please keep sharing your feedback and suggestions below!
Sincerely,
Team Snapmaker
Thank You! We made it the fastest ever project to reach $1M on Kickstarter, at just 7 minutes!
almost 7 years ago
– Wed, May 08, 2019 at 01:17:07 AM
Dear backers,
We’re super excited at what our campaign has been able to accomplish in just a few hours. We would like to say a big Thank You to you and the whole Snapmaker community! Today, we broke a lot of records together!!
Together, we smashed our funding goal in less than 1 minute!
This is the fastest ever project to reach $1m on Kickstarter,at just 7 minutes! And this is validated by Kickstarter.
We raised$2M right after 1 hour!
We broke the record of our first project right after 2 hours!
We can’t wait to see what we can make together with the next 29 days!
You can make a difference. Help us spread the word #newSnapmaker with your friends!
The Kickstarter Comment page is a good place for you to post your questions and join any existing discussions with other backers. We will go through all comments and messages, and start answering them tomorrow. However, for any new visitors, it is too hard to search the previous questions and relevant answers. Therefore, we’ll probably provide you with a complete guide of backing this project, which will include all the questions and answers, that is, not only the FAQs.
There's also a FAQ page for this project, where you can quickly read through the top 20 FAQs.
Thanks again! We are blown away and full of gratitude! We will have a lot more to share in the next update!